About SSH Connections
Table of Contents
Introduction
SSH (Secure Shell) is a protocol for secure communication between computers over a network. It is widely used for secure logins to remote servers, file transfers, and remote command execution.
This page provides a detailed explanation from the basic mechanics of SSH, to how to generate SSH keys, and finally to a practical application example of linking a local PC with GitHub. By acquiring this knowledge, you will be able to perform more secure and efficient remote operations and version control.
SSH Basics
What is SSH?
SSH (Secure Shell) is a protocol for securely conducting data communication over a network. It was developed in 1995 by Finnish researcher Tatu Ylönen and became popular as a replacement for insecure protocols that were widely used at the time (such as Telnet, rlogin, and rsh).
Main features of SSH:
- Encrypted Communication: All communication data is encrypted, which prevents eavesdropping by third parties.
- Strong Authentication: It supports not only password authentication but also authentication using public-key cryptography.
- Data Integrity: It can verify that data has not been tampered with during transit.
- Port Forwarding: It supports local port forwarding, remote port forwarding, and dynamic port forwarding.
- Diverse Applications: It can be used for various purposes such as remote login, file transfer (SCP, SFTP), and remote command execution.
Currently, SSH is an indispensable tool in many situations, including server management, cloud services, and version control systems (Git).
How SSH Authentication Works
SSH primarily uses the following two authentication methods:
- Password Authentication: The traditional authentication method using a username and password.
- Public Key Authentication: A more secure authentication method using public-key cryptography.
Public key authentication is recommended in many situations because it is superior in terms of both security and convenience. In this authentication method, the process is as follows:
- The user generates a private key and a public key pair.
- The public key is registered in the
~/.ssh/authorized_keysfile on the remote server. - During connection, the SSH client makes an authentication request using the private key.
- The server uses the registered public key to verify that the client truly possesses the corresponding private key.
- If the verification is successful, the connection is established.
The main advantages of this method are that there is no need to send a password over the network, and since the private key is stored on the local machine, authentication information will not be leaked even if the server-side database is compromised.
Types of SSH Keys
There are several types of SSH keys, depending on the cryptographic algorithm used:
- RSA Key: The most widely used key type, with high compatibility. A key length of 2048 bits or more is recommended.
- DSA Key: An older key type, now deprecated due to security concerns.
- ECDSA Key: A key using elliptic curve cryptography, which requires a shorter key length than RSA for an equivalent level of security.
- Ed25519 Key: A relatively new key type that offers high security and excellent performance. It is currently one of the most recommended types.
For new systems, using Ed25519 or RSA (4096 bits) is generally recommended. However, you need to check which key types are supported by the destination server or service.
SSH Key Generation
Key Generation Process
SSH keys are typically generated using the ssh-keygen command.
Here are the methods for generating SSH keys on major platforms:
Linux/macOS
Open a terminal and execute the following command:
# Generate an Ed25519 key (recommended)
ssh-keygen -t ed25519 -C "your_email@example.com"

# Or, generate an RSA 4096-bit key
ssh-keygen -t rsa -b 4096 -C "your_email@example.com"
After executing the command, the following prompts will appear:
- Key file save location (default is
~/.ssh/id_ed25519or~/.ssh/id_rsa) - Passphrase (optional, but recommended for improved security)
Windows (Git Bash/WSL)
In a Windows environment, you can use Git Bash or WSL (Windows Subsystem for Linux) to generate SSH keys with the same command as above.
Windows (PowerShell)
On Windows 10 and later, you can also generate SSH keys in PowerShell with the following command:
# Generate an Ed25519 key
ssh-keygen -t ed25519 -C "your_email@example.com"

# Or, generate an RSA 4096-bit key
ssh-keygen -t rsa -b 4096 -C "your_email@example.com"
Verifying the Keys
To confirm that the keys were generated successfully, run the following command:
# List the private and public keys
ls -la ~/.ssh
The generated key files are as follows:
id_ed25519orid_rsa: Private key (NEVER share this)id_ed25519.puborid_rsa.pub: Public key (register this on the remote server)
Key Management
Best practices for securely managing SSH keys:
- Protect the Private Key: Never share your private key with anyone and protect it with appropriate permissions (600).
- Use a Passphrase: By setting a passphrase for your private key, you can prevent unauthorized use even if the key is leaked.
- SSH-Agent: If you set a passphrase, using an SSH-Agent can save you the trouble of entering the passphrase every time.
- Back Up Your Keys: Backing up your private key in a secure location ensures you don't lose access in case of device loss or failure.
- Regularly Update Keys: Consider updating your keys periodically to maintain security.
Using SSH-Agent
Using an SSH-Agent allows you to enter your passphrase once, and subsequent connections will be authenticated automatically:
# Start the SSH-Agent
eval "$(ssh-agent -s)"

# Add the key
ssh-add ~/.ssh/id_ed25519
On macOS, you can also save the passphrase to the keychain:
# Add the following to the ~/.ssh/config file
Host *
  UseKeychain yes
  AddKeysToAgent yes
  IdentityFile ~/.ssh/id_ed25519
SSH Setup Between Client and Server
SSH Setup Flow
To establish an SSH connection, you need to perform the appropriate setup on both the client PC and the remote server. Here, we will explain the procedure for setting up an SSH connection using public key authentication.
Setting up an SSH connection is broadly divided into the following two steps:
- Generating a key pair on the client PC and storing the private key.
- Registering the public key on the remote server.
The following diagram shows the SSH connection setup process:

Tasks on the Client PC
First, perform the following steps on the client PC (local machine):
- Generate SSH Key Pair: As explained in the "SSH Key Generation" section, generate a
private and public key pair using the
ssh-keygencommand. - Store the Private Key: The generated private key (e.g.,
id_ed25519orid_rsa) is saved in the~/.ssh/directory and protected with appropriate permissions (600). - Prepare the Public Key: The generated public key (e.g.,
id_ed25519.puborid_rsa.pub) is prepared for transfer to the remote server.
Registering the Public Key on the Remote Server
Next, register the generated public key on the remote server. There are mainly the following methods for this:
1. Using the ssh-copy-id command (Recommended)
Using the ssh-copy-id command, you can transfer and register the public key in one go:
# Basic usage
ssh-copy-id username@remote-server

# Specifying a particular key file
ssh-copy-id -i ~/.ssh/id_ed25519.pub username@remote-server
This command adds the specified public key to the ~/.ssh/authorized_keys file on the remote
server.
Password authentication is required for the initial connection, but once set up, you can connect without
a password thereafter.
2. Manually Transferring and Registering the Public Key
In environments where ssh-copy-id is not available, you can perform a manual setup with the
following steps:
# Display and copy the public key content
cat ~/.ssh/id_ed25519.pub

# SSH into the remote server (with password authentication)
ssh username@remote-server

# Execute the following commands on the remote server
mkdir -p ~/.ssh
chmod 700 ~/.ssh
echo "copied_public_key_content" >> ~/.ssh/authorized_keys
chmod 600 ~/.ssh/authorized_keys
3. Transferring the Public Key using SCP
You can also transfer the public key file using SCP and then configure it on the remote server:
# Transfer the public key to the remote server
scp ~/.ssh/id_ed25519.pub username@remote-server:/tmp/

# SSH into the remote server
ssh username@remote-server

# Execute the following commands on the remote server
mkdir -p ~/.ssh
chmod 700 ~/.ssh
cat /tmp/id_ed25519.pub >> ~/.ssh/authorized_keys
chmod 600 ~/.ssh/authorized_keys
rm /tmp/id_ed25519.pub
Verifying the Setup
Once the public key registration is complete, verify that you can connect via SSH without a password:
ssh username@remote-server
If you can connect without being prompted for a password, the setup is successful.
If you have trouble connecting, you can use the -v option to see detailed debug
information:
ssh -v username@remote-server
Details of the SSH Authentication Process
When an SSH connection is established, a complex authentication process takes place between the client and the server. Here, we will explain the detailed process of an SSH connection using public key authentication.
The following diagram shows the sequence of SSH authentication:
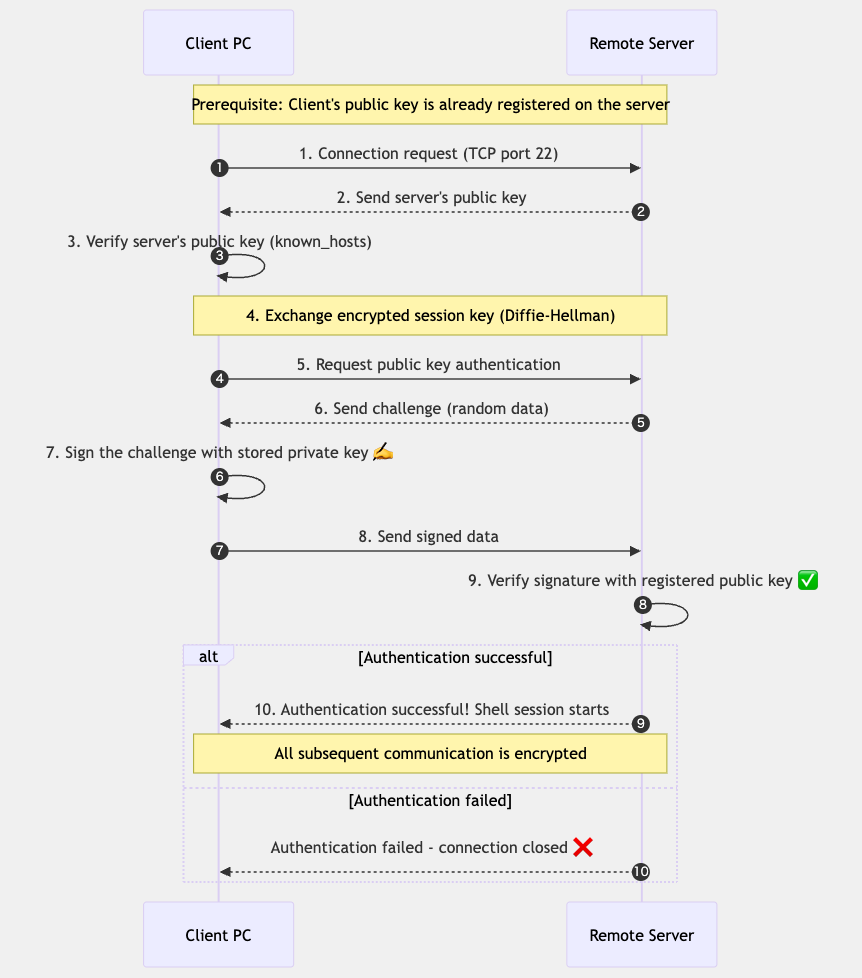
Detailed Steps of SSH Connection and Authentication
- Connection Request: The client sends a connection request to the server's SSH port (usually 22).
- Server Public Key Transmission: The server sends its host public key to the client.
- Host Key Verification: The client verifies the server's public key by checking it
against the
~/.ssh/known_hostsfile. On the first connection, a prompt is displayed to confirm the key's fingerprint. - Session Key Exchange: The client and server use the Diffie-Hellman key exchange algorithm to establish an encrypted session key.
- Public Key Authentication Request: The client requests public key authentication from the server.
- Challenge Transmission: The server generates random data (a challenge) and sends it to the client.
- Signing the Challenge: The client signs the challenge using its own private key.
- Transmission of Signed Data: The client sends the signed data to the server.
- Signature Verification: The server verifies the signature using the public key
registered in
~/.ssh/authorized_keys. - Authentication Result: If the verification is successful, authentication is complete, and a shell session begins. If it fails, the connection is closed.
Communication After Successful Authentication
Once authentication is successful, all communication between the client and server is encrypted using the established session key. This protects the communication content from eavesdropping or tampering by third parties.
Security Considerations
Points to enhance the security of the SSH authentication process:
- Host Key Verification: Always verify the host key fingerprint displayed on the first connection to prevent "Man-in-the-Middle" attacks.
- Private Key Protection: Protect the private key with appropriate permissions and it is recommended to set a passphrase.
- Server-side Configuration: On the server side, you can strengthen security by
disabling password authentication and restricting root login in the
/etc/ssh/sshd_configfile. - Key Type and Length: Use highly secure Ed25519 keys or RSA keys with sufficient length (4096 bits or more).
Managing the known_hosts File
The known_hosts file is a crucial file used by the SSH client to verify the identity of
remote servers.
Here are some additional information and tips for managing the known_hosts file.
known_hosts File Basics
- Location: Usually stored in
~/.ssh/known_hosts(user-specific) or/etc/ssh/ssh_known_hosts(system-wide). - Format: Each line records server information in the format "hostname key-type public-key".
- Purpose: To record and verify the public keys of destination servers to prevent Man-in-the-Middle attacks.
Common Operations and Commands
Commands to efficiently manage the known_hosts file:
# Remove a specific host's key (e.g., if the host's IP or DNS has changed)
ssh-keygen -R hostname

# Pre-add a specific host's key (useful for automation in scripts)
ssh-keyscan -H hostname >> ~/.ssh/known_hosts

# Check the fingerprint of a specific host's key
ssh-keygen -l -F hostname

# Hash the known_hosts file (for improved security)
ssh-keygen -H -f ~/.ssh/known_hosts
Troubleshooting and Common Issues
Common issues and solutions related to the known_hosts file:
- "WARNING: REMOTE HOST IDENTIFICATION HAS CHANGED!" Error: Displayed when the
server's key has changed. If the server was legitimately reinstalled, remove the old key with
ssh-keygen
                        -R hostname
and then reconnect. - "Someone could be eavesdropping on you right now" Warning: This could be a Man-in-the-Middle attack. Contact the server administrator to confirm if the key change was legitimate.
- Setting up Automatic Responses: To automate the confirmation on the first
connection, you can set
StrictHostKeyChecking=noin~/.ssh/config, but this is not recommended in production environments due to security risks.
Security Best Practices
- Key Verification: Ideally, on the first connection, obtain the key fingerprint from the server administrator through another secure channel (phone, encrypted message, etc.) and verify it.
- Regular Backups: Regularly back up the
known_hostsfile to prepare for accidental deletion. - Use Hashing: Set
HashKnownHosts yesin~/.ssh/configto hash hostnames and reduce the risk of information leakage. - System-wide Configuration: On shared servers, add keys of trusted hosts to
/etc/ssh/ssh_known_hostsso that all users can connect securely.
Advanced Configuration Options
Settings related to known_hosts in the ~/.ssh/config file:
Host *
    # Specify the location of the known_hosts file
    UserKnownHostsFile ~/.ssh/known_hosts.d/default

    # Enable hashing of hostnames
    HashKnownHosts yes

    # Set strict host key checking
    # yes: do not connect to unknown hosts
    # ask: ask before connecting to unknown hosts (default)
    # no: connect to unknown hosts without warning (insecure)
    StrictHostKeyChecking ask

    # Use a different known_hosts file for a specific host
Host example.com
    UserKnownHostsFile ~/.ssh/known_hosts.d/example
SCP and SFTP
SCP and SFTP Basics
SCP and SFTP are tools for securely transferring files using the SSH protocol. Both leverage the encryption features of SSH, allowing for secure file transfers over the internet.
What is SCP?
SCP (Secure Copy Protocol) is a file transfer protocol based on the SSH protocol, used to securely copy files between a local machine and a remote host, or between two remote hosts. SCP is implemented as a command-line tool and allows for simple and efficient file transfers.
Main features of SCP:
- Encrypted Communication: All data transfer is encrypted by the SSH protocol.
- Authentication: Uses the same authentication mechanisms as SSH (password or public key authentication).
- Simple Operation: A simple command structure specialized for basic copy operations.
- Efficiency: Efficient for transferring single files or a small number of files.
What is SFTP?
SFTP (SSH File Transfer Protocol) is a file transfer protocol that operates over the SSH protocol, offering more feature-rich file operations than SCP. SFTP has an operational feel similar to FTP, while ensuring security by using the encryption and authentication functions of SSH.
Main features of SFTP:
- Encrypted Communication: All data transfer is encrypted by the SSH protocol.
- Authentication: Uses the same authentication mechanisms as SSH.
- Feature-rich: In addition to file uploads/downloads, it also allows for remote file operations (renaming, deleting, changing permissions, etc.).
- Resume Functionality: Has a feature to resume interrupted transfers.
- Interactive Operation: Provides an interactive shell, allowing for consecutive file operations.
Differences Between SCP and SFTP
The main differences are as follows:
- Functionality: SFTP is more feature-rich than SCP and allows for remote file operations.
- Protocol: SCP is a simple copy protocol, while SFTP is a more complex file transfer protocol.
- Usage Scenario: SCP is suitable for simple file copying, while SFTP is suitable for complex file management tasks.
- Transfer Resume: SFTP can resume interrupted transfers, but SCP does not have this feature.
- Scripting: SCP is simpler, making it easier for automation in scripts.
How to Use SCP
Here are the basic syntax and common usage examples of the SCP command.
Basic Syntax
scp [options] source destination
Source and destination are specified in the following format:
[username@]hostname:filepath
Common Usage Examples
Copying a local file to a remote server:
# Copy a single file to a remote server
scp local_file.txt username@remote_server:/path/to/destination/

# Copy multiple files to a remote server
scp file1.txt file2.txt username@remote_server:/path/to/destination/

# Copy a directory to a remote server (recursively)
scp -r local_directory/ username@remote_server:/path/to/destination/
Copying a file from a remote server to local:
# Copy a remote file to local
scp username@remote_server:/path/to/remote_file.txt local_directory/

# Copy a remote directory to local (recursively)
scp -r username@remote_server:/path/to/remote_directory/ local_directory/
Copying a file between remote servers:
# Copy a file from server1 to server2
scp username1@server1:/path/to/file.txt username2@server2:/path/to/destination/
Frequently Used Options
-r: Recursively copy directories.-p: Preserves modification times, access times, and permissions from the original file.-P port: Specifies the port to connect to on the remote host (default is 22).-C: Enables compression.-l limit: Limits the used bandwidth, specified in Kbit/s.-q: Disables the progress meter (quiet mode).-v: Verbose mode. Prints debugging messages.
Practical Examples
Transferring a large file with compression enabled:
scp -C large_file.zip username@remote_server:/path/to/destination/
Transferring a file using a non-standard port:
scp -P 2222 file.txt username@remote_server:/path/to/destination/
Transferring a file with a bandwidth limit (to reduce impact on other network traffic):
scp -l 1000 large_file.zip username@remote_server:/path/to/destination/
How to Use SFTP
Here are the basic usage and common commands for SFTP.
Starting an SFTP Session
# SFTP connect to a remote server
sftp username@remote_server

# SFTP connect using a non-standard port
sftp -P 2222 username@remote_server
Once the connection is established, the SFTP prompt (sftp>) will be displayed,
where you can enter SFTP commands.
Basic SFTP Commands
File transfer commands:
# Download a file from remote to local
get remote_file.txt [local_file.txt]

# Download multiple files
mget *.txt

# Upload a file from local to remote
put local_file.txt [remote_file.txt]

# Upload multiple files
mput *.txt

# Download a directory recursively
get -r remote_directory/

# Upload a directory recursively
put -r local_directory/
Directory operation commands:
# Show the current remote directory
pwd

# Show the current local directory
lpwd

# List the contents of the remote directory
ls [directory]

# List the contents of the local directory
lls [directory]

# Change the remote directory
cd remote_directory

# Change the local directory
lcd local_directory

# Create a remote directory
mkdir remote_directory

# Create a local directory
lmkdir local_directory
File management commands:
# Rename or move a remote file
rename old_name new_name

# Delete a remote file
rm remote_file

# Delete a remote directory
rmdir remote_directory

# Change permissions of a remote file
chmod 644 remote_file

# Change owner/group of a remote file
chown user:group remote_file
Other commands:
# Show help
help

# Exit the SFTP session
exit or bye or quit
SFTP Scripting
You can also put SFTP commands in a file for batch processing:
# Create a command file
echo "cd /remote/directory
get file1.txt
get file2.txt
put local_file.txt
bye" > sftp_commands.txt

# Execute the command file
sftp -b sftp_commands.txt username@remote_server
SFTP Clients
In addition to the command-line SFTP, there are many graphical SFTP clients:
- FileZilla: A cross-platform graphical SFTP client.
- WinSCP: A graphical SFTP client for Windows.
- Cyberduck: A graphical SFTP client for macOS and Windows.
- Transmit: A powerful SFTP client for macOS.
Security and Precautions
Here are the best practices and precautions for using SCP and SFTP securely.
Security Best Practices
- Use Public Key Authentication: Using public key authentication instead of password authentication improves security.
- Strong Passphrase: Set a strong passphrase to protect your private key.
- Use the Latest Versions: Always use the latest versions of SSH/SCP/SFTP clients and servers to avoid known vulnerabilities.
- Firewall Configuration: Open only necessary ports and restrict unnecessary access.
- Access Control: Restrict SCP/SFTP access to only necessary users.
SCP Limitations and Precautions
- Protocol Limitations: SCP only supports basic file transfer and does not allow for advanced file operations.
- Error Handling: SCP has limited error handling, which can cause problems during large file transfers.
- Transfer Resume: It cannot resume interrupted transfers.
- Security Concerns: Older SCP protocols have known security issues, and it is recommended to use SFTP if possible.
SFTP Precautions
- Performance: For simple file transfers, it may have slightly more overhead than SCP.
- Compatibility: Some older systems may not support SFTP.
- Configuration Complexity: Because it has more features, configuration can be more complex.
Alternatives
Besides SCP and SFTP, there are other alternatives for secure file transfer:
- rsync over SSH: Provides efficient differential transfer and resume capabilities.
- FTPS: FTP using SSL/TLS (different from SFTP).
- WebDAV over HTTPS: A web-based file transfer protocol.
- Cloud Storage Services: Dropbox, Google Drive, OneDrive, etc.
Deprecation and Future of SCP
The developers of OpenSSH are gradually deprecating the use of SCP due to known security issues in the SCP protocol and recommend using SFTP instead. In future OpenSSH versions, the SCP command may be changed to use the SFTP protocol internally.
Integration with GitHub (SSH Public Key Authentication)
SSH Setup on GitHub
To set up an SSH connection with GitHub, follow these steps:
- Generate an SSH Key: Generate an SSH key pair using the method described earlier.
- Copy the Public Key: Copy the contents of the public key to your clipboard with the
following command:
# macOS cat ~/.ssh/id_ed25519.pub | pbcopy # Windows (PowerShell) Get-Content ~/.ssh/id_ed25519.pub | Set-Clipboard # Linux cat ~/.ssh/id_ed25519.pub | xclip -selection clipboard - Add the Public Key to Your GitHub Account:
- Log in to GitHub, click on your profile icon in the top right, and select "Settings".
- From the left sidebar, select "SSH and GPG keys".
- Click the "New SSH key" button.
- In the "Title" field, enter a description for the key (e.g., "Work Laptop").
- In the "Key" field, paste the public key you just copied.
- Click the "Add SSH key" button.
- Test the Connection: Test your SSH connection to GitHub with the following command:
ssh -T git@github.comOn the first connection, a message will appear to confirm the server's fingerprint. Type "yes" to continue. If the connection is successful, a message like the following will be displayed:Hi username! You've successfully authenticated, but GitHub does not provide shell access.
Using SSH with GitHub
After setting up the SSH connection, here is how to use SSH for operations with GitHub repositories:
Cloning a New Repository
On the GitHub repository page, click the "Code" button, select the "SSH" tab, and copy the URL. Then, clone the repository with the following command:
git clone git@github.com:username/repository.git
Changing the Remote URL of an Existing Repository
To change from HTTPS to SSH, use the following commands:
# Check the current remote URL
git remote -v

# Change the remote URL to SSH
git remote set-url origin git@github.com:username/repository.git

# Verify the change
git remote -v
Push and Pull
With the SSH connection configured, you can push and pull with the usual Git commands without entering a password:
# Push changes
git push origin main

# Pull changes
git pull origin main
Troubleshooting
How to deal with problems when connecting to GitHub via SSH:
Connection Test Fails
If the ssh -T git@github.com command fails:
- Test in Debug Mode: Run
ssh -vT git@github.comto see detailed information. - Check the Keys: Check the currently loaded keys with
ssh-add -l. - Key Permissions: Check if the private key permissions are correct (
chmod 600
                    ~/.ssh/id_ed25519
). - ~/.ssh/config: Check if the configuration file is correct.
Authentication Error
If you see a "Permission denied (publickey)" error:
- Check Public Key Registration: Verify that the public key is correctly registered on your GitHub settings page.
- Specify the Key to Use: Test by specifying a particular key with
ssh -i
                    ~/.ssh/id_ed25519 -T git@github.com
. - Check the SSH-Agent: Check if the key has been added to the agent with
ssh-add
                    -l
.
Other Issues
- Firewall: Check if port 22 (SSH) is open.
- Proxy: In a proxy environment, you may need to adjust your SSH settings.
- Regenerate Keys: If the problem persists, consider generating a new key pair and setting it up again.
X11 Forwarding
X11 Forwarding Basics
X11 Forwarding is a feature of SSH that allows you to forward the display of graphical applications running on a remote server to your local machine. This makes it possible to operate GUI applications on a remote server on your local machine's screen.
X11 refers to protocol version 11 of the X Window System, a windowing system widely used in Unix-like systems. This protocol adopts a client-server model to provide a graphical user interface (GUI).
How X11 Forwarding works:
- Log in to the remote server from the local machine (client) with an SSH connection.
- Launch a graphical application on the remote server.
- The application's display data is encrypted and transferred to the local machine through the SSH connection.
- The X server on the local machine receives this data and displays it on the screen.
This feature is very convenient when you need to use graphical tools on a remote server, or when developing or debugging applications on a remote machine.
How to Set Up X11 Forwarding
To use X11 forwarding, you need to configure it on both the client and server sides:
Server-side Configuration
Enable X11 forwarding in the SSH server (sshd) configuration file (usually
/etc/ssh/sshd_config):
X11Forwarding yes
X11DisplayOffset 10
X11UseLocalhost yes
After changing the configuration, you need to restart the SSH service:
# For Linux (using systemd)
sudo systemctl restart sshd

# For macOS
sudo launchctl unload /System/Library/LaunchDaemons/ssh.plist
sudo launchctl load /System/Library/LaunchDaemons/ssh.plist
Client-side Configuration
Add the following settings to the client-side SSH configuration file (~/.ssh/config):
Host *
    ForwardX11 yes
    ForwardX11Trusted yes
Alternatively, you can use the -X or -Y option when connecting:
-X: Enables basic X11 forwarding (with security restrictions).-Y: Enables trusted X11 forwarding (with fewer security restrictions).
Required Software
To use X11 forwarding, you need the following software:
- Linux: An X server is usually installed by default.
- macOS: You need to install an X server like XQuartz.
- Windows: You need to install an X server like Xming, VcXsrv, or X410.
Examples of Using X11 Forwarding
Here are examples of running remote applications using X11 forwarding:
Basic Usage
Connect via SSH with X11 forwarding enabled:
# Basic X11 forwarding
ssh -X username@remote-server

# Trusted X11 forwarding
ssh -Y username@remote-server
After connecting, launch a graphical application on the remote server:
# Examples of simple graphical applications
xclock
xeyes
firefox
gedit
The application's window will appear on your local machine's screen.
Practical Use Scenarios
- Remote Development: Developing using an IDE or text editor on a remote server.
- Data Analysis: Using data visualization tools (Matplotlib, R, etc.) on a remote server.
- System Administration: Using graphical management tools on a remote server.
- Browser Testing: Testing using a web browser on a remote server.
Performance Optimization
X11 forwarding is convenient, but it can consume a lot of network bandwidth. Tips for improving performance:
- Enable Compression:
ssh -XC username@remote-server(the-Coption enables compression). - Use Lightweight Applications: Choose lightweight applications over complex GUIs.
- Use on a Local Network: Recommended for use within a local network rather than over the internet.
- Consider VNC: For complex graphical work, VNC may be more suitable than X11 forwarding.
X11 Forwarding Security
X11 forwarding is convenient, but there are security considerations:
Potential Risks
- X11 Protocol Vulnerabilities: The X11 protocol itself has limited security features.
- Keylogging Risk: A malicious program could intercept key inputs through X11.
- Screen Capture: A remote application could capture the entire screen.
- Risk of Trusted X11 Forwarding (-Y): The
-Yoption relaxes security restrictions and should only be used with trusted servers.
Security Measures
- Use Only with Trusted Servers: Enable X11 forwarding only with servers you trust.
- Enable Only When Needed: Use X11 forwarding only when necessary, rather than having it always enabled.
- Use the -X Option: Use the
-Xoption instead of-Ywhenever possible. - Use the Latest SSH Version: Always use SSH clients and servers with the latest security patches applied.
- Firewall Configuration: Open only necessary ports and restrict unnecessary access.
Alternatives
If X11 forwarding is a security concern, you can consider the following alternatives:
- VNC: VNC is suitable if you need to access the entire remote desktop.
- RDP: In a Windows environment, RDP (Remote Desktop Protocol) is an option.
- Web-based Interfaces: Many applications provide web interfaces.
- Port Forwarding: You can also consider forwarding only the port of a specific application.
Port Forwarding
Port Forwarding Basics
Port forwarding (also called SSH tunneling) is a technique that uses the SSH protocol to transfer data through an encrypted tunnel. This allows for secure access to resources that are normally inaccessible and communication that bypasses firewalls.
Main advantages of Port Forwarding:
- Encrypted Communication: All traffic is encrypted by the SSH protocol, so you can protect confidential data even over insecure communication channels.
- Firewall Bypass: Even in environments where specific ports or protocols are blocked, communication is possible through an allowed SSH connection.
- Privacy Protection: You can avoid monitoring from your Internet Service Provider (ISP) or middlemen.
- Access to Remote Resources: It allows you to access services from the outside that are normally only accessible within a local network.
Port forwarding is utilized for various purposes, such as database management, remote desktop connections, and private web Browse.
Types of Port Forwarding
There are mainly the following three types:
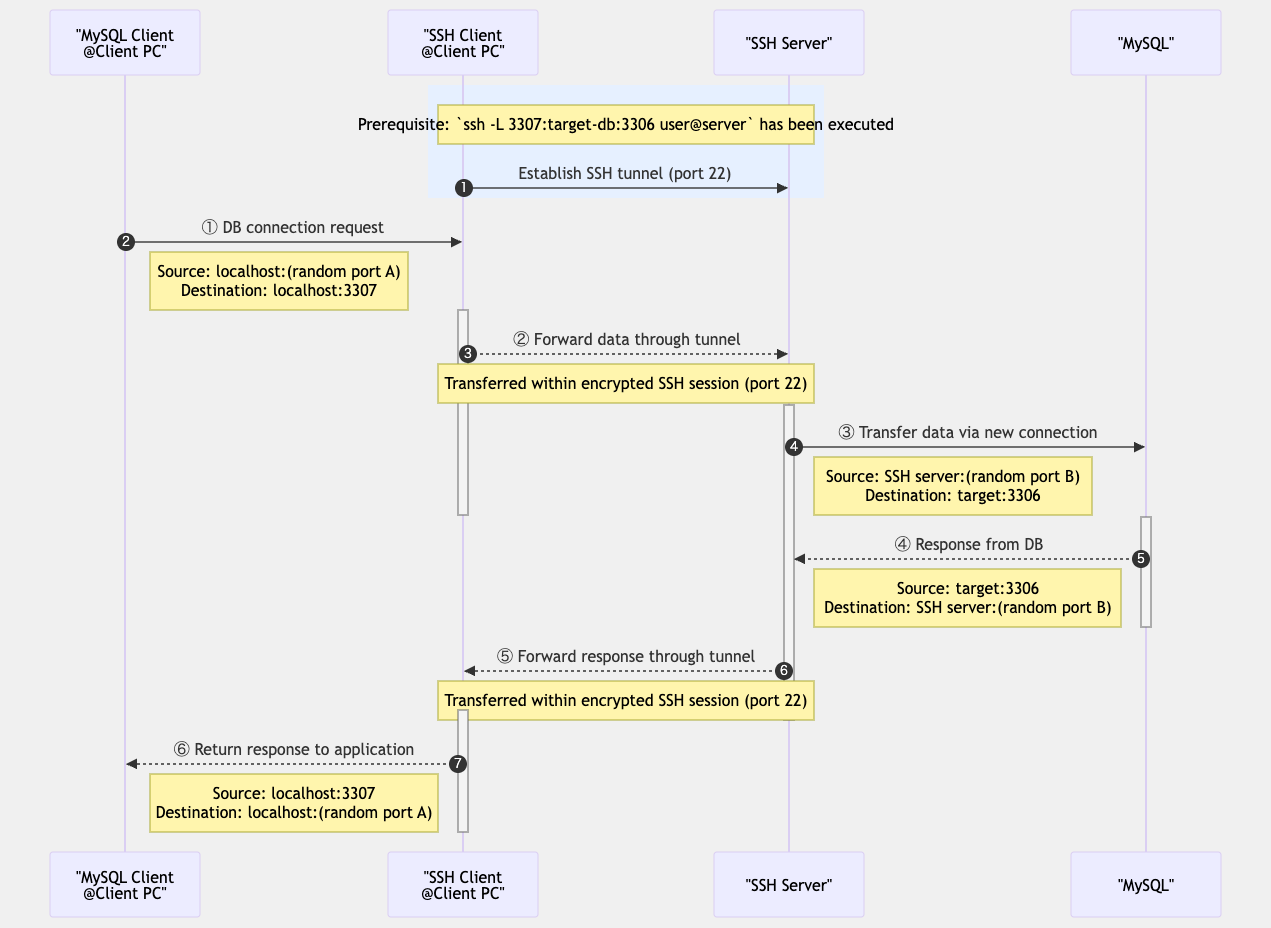
1. Local Port Forwarding
Local port forwarding forwards a port on the local machine to a port on the remote server. When you connect to the specified port on the local machine, that connection is forwarded through the SSH tunnel to the specified port on the remote server.
Common syntax:
ssh -L local_port:destination_host:destination_port username@ssh_server
For example, when connecting to a remote database server:
# Connect from local port 3307 to the remote server's MySQL port (3306)
ssh -L 3307:localhost:3306 username@remote-server
After this setup, connecting to localhost:3307 on the local machine will forward the
connection to localhost:3306 on the remote server.
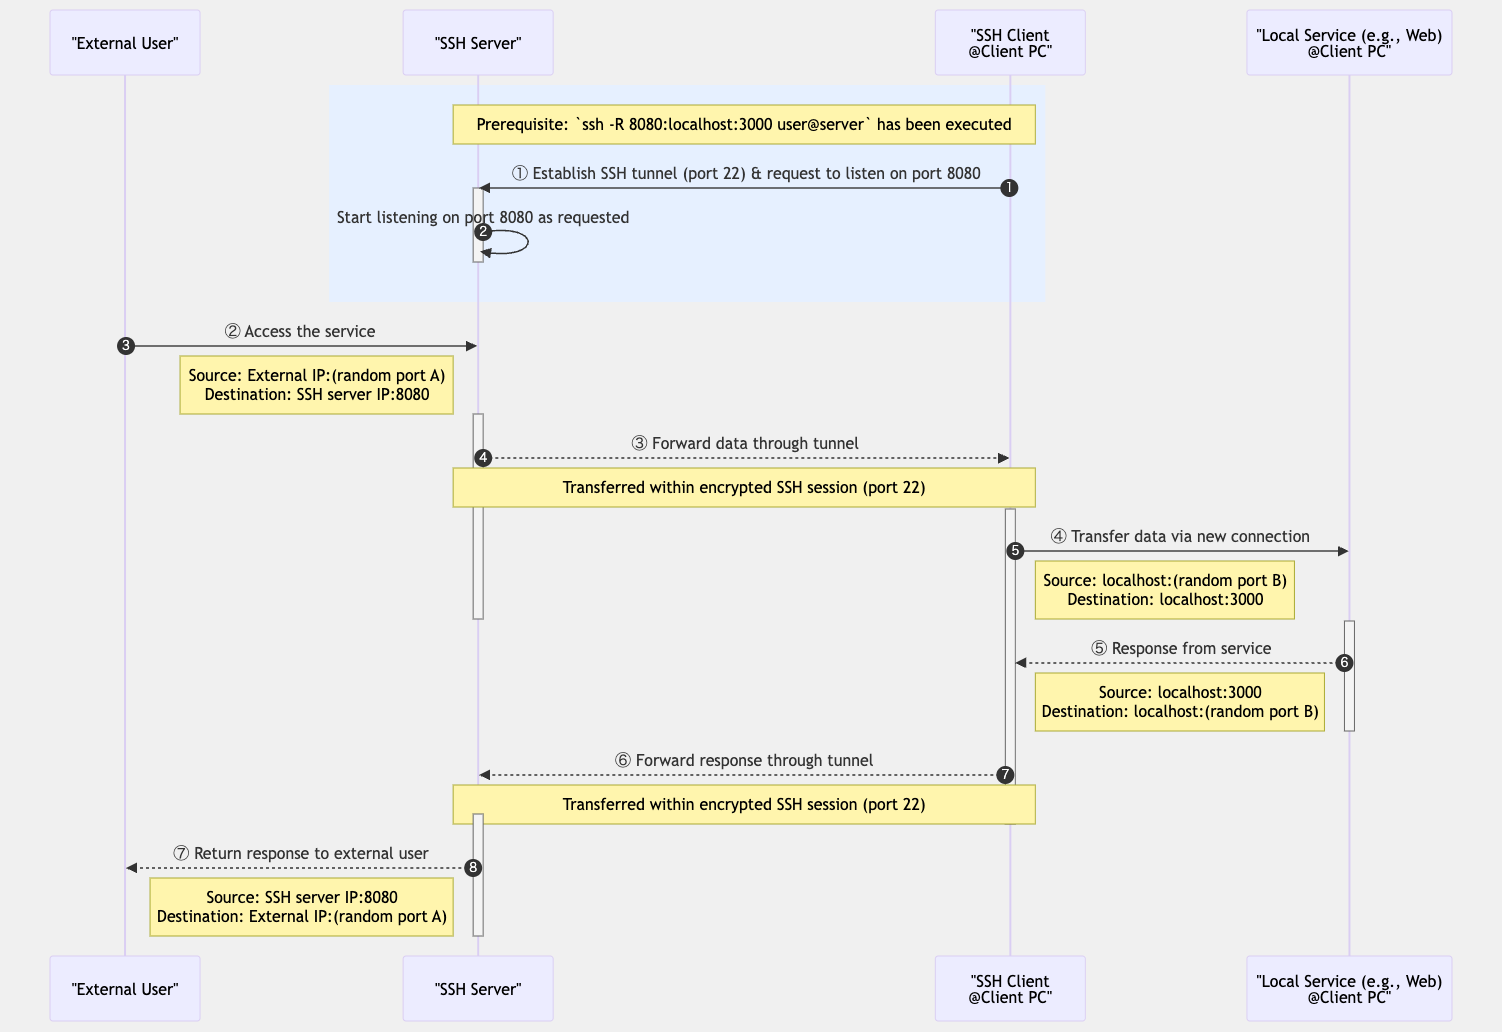
2. Remote Port Forwarding
Remote port forwarding forwards a port on the remote server to a port on the local machine. This is the reverse of local port forwarding and is used, for example, to access a service on a local machine from the internet.
Common syntax:
ssh -R remote_port:destination_host:destination_port username@ssh_server
For example, to make a web server running locally available from a remote location:
# Connect from remote server's port 8080 to the local web server (port 3000)
ssh -R 8080:localhost:3000 username@remote-server
After this setup, connecting to localhost:8080 on the remote server will forward the
connection to localhost:80 on the local machine.
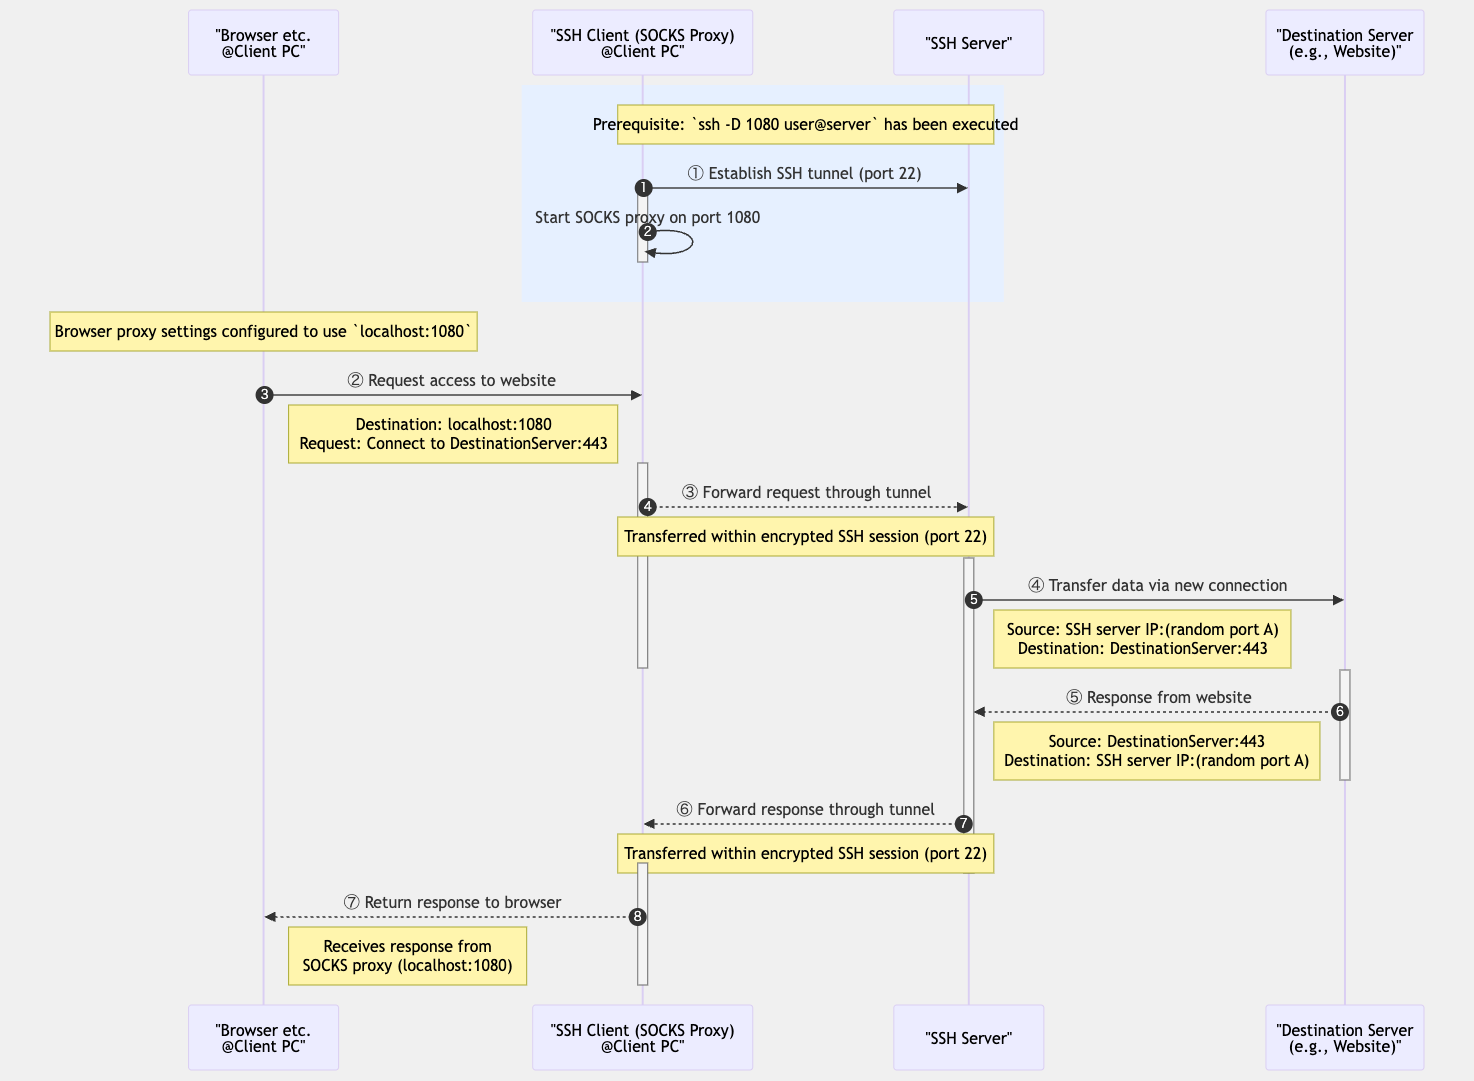
3. Dynamic Port Forwarding
Dynamic port forwarding sets up a SOCKS proxy and forwards traffic to multiple destinations through an SSH tunnel. This is useful for tunneling all traffic from web Browse or other applications.
Common syntax:
ssh -D local_port username@ssh_server
For example, to set up a SOCKS proxy on local port 1080:
# Set up a SOCKS proxy on local port 1080
ssh -D 1080 username@remote-server
After this setup, if you specify localhost:1080 as the SOCKS proxy in your browser or other
applications,
all traffic will be sent from the remote server through the SSH tunnel.
Security Considerations
Port forwarding is a secure means of communication, but if not properly configured and managed, it can pose security risks:
Potential Risks
- Improper Binding: Binding port forwarding to
0.0.0.0(all interfaces) instead oflocalhostcan allow unintended access. - Authentication Bypass: Tunneling can allow access to services that are normally access-restricted without authentication.
- Violation of Organizational Policies: It may violate the network policies of a company or organization.
- Resource Consumption: Long-running tunnels can consume server resources.
Security Measures
- Proper Binding: Unless absolutely necessary, bind port forwarding only to
localhost. - Strong Authentication: Use public key authentication on the SSH server and set a strong passphrase.
- Tunnel Restriction: In the SSH server configuration, allow only necessary port forwarding.
- Idle Timeout: Configure tunnels that have been unused for a long time to close automatically.
- Log Monitoring: Regularly check the SSH server logs and monitor for suspicious tunneling activity.
Server-side Configuration
Settings in the SSH server (/etc/ssh/sshd_config) to control port forwarding:
# Allow/deny all port forwarding
AllowTcpForwarding yes/no

# Allow only local port forwarding
AllowTcpForwarding local

# Allow/deny remote port forwarding
GatewayPorts yes/no

# Restrictions for specific users or groups
Match User username
    AllowTcpForwarding yes
    PermitOpen localhost:3306 localhost:5432
After changing these settings, you need to restart the SSH service.
SSH Security
Best Practices
Best practices for using SSH more securely:
- Use Strong Key Types and Lengths: Use Ed25519 or RSA (4096 bits).
- Set a Passphrase: Set a strong passphrase for your private key.
- Disable Password Authentication: Configure to use only public key authentication.
- Restrict Root Login: Prohibit direct root login and use a regular user with sudo privileges.
- Change the SSH Port: Change from the default port 22 to avoid automated scans.
- Firewall Configuration: Allow SSH connections only from trusted IP addresses.
- Limit Failed Login Attempts: Use tools like Fail2ban to prevent brute-force attacks.
- Regular Updates: Keep the SSH server and client at their latest versions.
- Monitor Logs: Regularly check SSH connection logs to detect suspicious activity.
Common Issues and Solutions
Common issues that occur when using SSH and their solutions:
Connection Issues
- Connection Timeout: Check firewall settings, network connection, and the status of the SSH server.
- Host Key Changed: If the host key has changed due to a server reinstallation,
remove the corresponding entry from the
~/.ssh/known_hostsfile. - Connection Drops Frequently: Set
ServerAliveIntervalandServerAliveCountMaxin~/.ssh/config.
Authentication Issues
- Permission Errors: Check the permissions of the
~/.sshdirectory and key files (directory should be 700, private key 600). - Forgot Passphrase: If you forget the passphrase for your private key, you must generate a new key pair.
- Managing Multiple Keys: In the
~/.ssh/configfile, specify which key to use for each host.
Performance Issues
- Slow Connection: Measures such as disabling DNS reverse lookup, enabling compression, and using faster encryption algorithms.
- X11 Forwarding Issues: If X11 forwarding is needed, use the
-Xor-Yoption and ensure the necessary packages are installed.